Short Message Service (SMS) Alerts are similar to
e-mail alerts in SharePoint 2010. When the option for SMS Alerts is
configured at the farm or Web application level, users can select to
receive SMS Alerts. When a user wants to be made aware of changes on a
list, library, or item, the user selects Alert Me from the Library
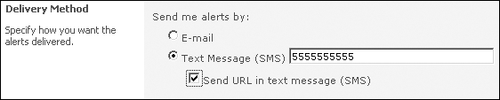
submenu of the Library Tools menu. After completing the required
information, the user selects Text Message (SMS) as the delivery method for the alerts, as shown in Figure 1,
and then specifies a telephone number to use for sending alerts. A user
can optionally choose to have the URL of the site associated with the
change included in the message.
If the user entered a
telephone number while using this feature in a prior session, the system
will remember that number for future use. Notice that the user can
select either E-mail or Text Message as the form of delivery for alerts,
not both. Users must create two separate alerts to receive both e-mail
and SMS alerts.
The benefit of SMS Alerts is
that the user doesn’t need access to e-mail in order to receive
up-to-the-minute notifications of changes within SharePoint. This can be
beneficial if the user does not have access to e-mail while out of the
office, especially if the user is not using a company-provided smart
phone or other e-mail–enabled device. The other benefit is that the SMS
feature arguably delivers messages faster than e-mail, but this varies
based on the e-mail delivery mechanism in place. For example, if the
e-mail–to–device delivery system is a push system, the difference in
delivery time is negligible. Simply put, SMS is fast, assuming the
providers’ systems are not bogged down by heavy traffic. To configure
SMS Alerts, you need to specify a mobile account within SharePoint
Central Administration. You can identify a mobile account to use for the
entire farm or for a specific Web application; however, only one mobile
account may be configured within a farm. The decision to specify a
mobile account for the entire farm or for a particular Web application
will depend largely on the scale of your implementation and the specific
requirements. For most small- and medium-sized implementations,
specifying a mobile account at the farm makes things easier, because it
enables the user alert option farm-wide and requires no additional
configuration.
To specify a mobile account, you need to have procured a compatible online SMS service, which is offered by an Office
2010 Mobile Service provider. These providers expose the ability to
send SMS messages online. After you configure the SMS service, the
server communicates directly with the provider’s Web service, which send
the SMS messages to user devices. Selecting and signing up for one of
these services is part of the mobile account configuration process. Finally, if the user elects to have a URL
included in the SMS Alert, and you want the user to be able to use that
URL to access information in SharePoint 2010, you need to ensure that
the information is externally available in a secure fashion.
1. Mobile Account Prerequisites
To configure a mobile account within SharePoint 2010, you need to meet the following prerequisites.
You must be a member of the Farm Administrators group.
The Simple Mail Transfer Protocol (SMTP) service must be installed and configured.
A Secure Sockets Layer (SSL) connection must be used between the SharePoint server and the provider.
The farm must be able to communicate to the selected service provider’s service.
2. Configuring a Mobile Account at the Farm Level
To configure a mobile account at the farm level and enable SMS Alerts for the entire organization, perform the following steps.
Open a browser and go to the SharePoint Central Administration website.
Click Systems Settings on the left menu.
Click Configure Mobile Account, which is in the E-mail And Text Messaging (SMS) settings group.
In
the Text Message (SMS) Service Settings section, click the Microsoft
Office Online link to access a list of service providers.
On
the Find An Office 2010 Mobile Server Provider page, choose your
wireless service provider’s country or region and then choose your
wireless service provider.
After making this selection, you are directed to a third-party website through which you may apply for the SMS
service. When you receive the required information from the provider,
you can return to the Mobile Accounts Settings page to enter the
information.
Enter the URL of the SMS service in The URL Of The Text
Message (SMS) Service text box and click Test Service to confirm that
the URL is correct and the server can successfully communicate with the
service.
Enter
the user name and password information assigned to you by the
third-party SMS service provider in the User Name and Password text
boxes and then click OK.
After you have configured the mobile account, users will be able to subscribe to alerts.
3. Configuring a Mobile Account at the Web Application Level
To configure a mobile
account at the Web application level and enable SMS Alerts for users
within that Web application, perform the following steps.
Open a browser and go to the SharePoint Central Administration website.
Click Application Management on the left menu.
Click the Manage Web Applications link, then expand General Settings, and click Mobile Account.
On
the Web Application Text Message (SMS) Service Settings page, in the
Web Application section, select the Web application for which you want
to configure a mobile account.
On
the Mobile Accounts Settings page, in the Text Message (SMS) Service
Settings section, click the Here link to access a list of service
providers.
On
the Find An Office 2010 Mobile Server Provider page, choose your
wireless service provider’s country or region and then choose your
wireless service provider.
After
making this selection, you are directed to a website through which you
can apply for the SMS service. When you receive the required information
from the provider, return to the Mobile Accounts Settings page and
enter the information.
Enter
the URL of the SMS service in The URL Of The Text Message (SMS) Service
text box and then click Test Service to confirm that the URL is correct
and the server can successfully communicate with the service.
Enter
the provided user name and password information, as received from the
SMS service provided, in the User Name and Password text boxes and then
click OK.
When you have configured the mobile account, users will be able to subscribe to alerts within the Web application selected.
4. Configuring a Mobile Account Using Windows PowerShell
To configure a mobile account at the Web application level using Windows PowerShell and enable SMS Alerts for users within that Web application, perform the following steps.
Open the SharePoint Management Console.
In the command window, run the following command after customizing it to meet the needs of your environment.
get-spwebapplication -identity<http://localhost> | set-spmobilemessagingaccount
-identity sms[-serviceurl<http://localhost/abc.asmx>]
After you have configured the mobile account, users will be able to subscribe to alerts within the Web application selected.